SqueezePlug found a new home, under Max2Play!
You can find all of SqueezePlug’s features and much more under the beginner friendly Max2Play system.
Hi folks,
G R E A T N E W S !
SqueezePlug & Max2Play are very happy to tell you, that SqueezePlug is now available in a complete new Web-based version!
SqueezePlug & Max2Play is the new combination of SqueezePlug, the famous Multiroom Audio Solution and Max2Play, the web-based framework for controlling Linux-based Mini-Computer like Raspberry Pi, Odroid and others through a simple web interface without any, absolutely any Linux Know-How. SqueezePlug is now a plug-in in Max2Play to make the configuration as easy as possible. There is no need for connecting a monitor, a keyboard or a mouse to the device itself. It all runs headless and no special tools like Putty are needed any more. The configuration is as simple as configuring a router from an web interface!
The new name for this great Multiroom Audio Solution is “SqueezePlug & Max2Play”.
SqueezePlug & Max2Play worked very hard in the last month to build this new version of an easy to use Multiroom Audio Solution so give it a try and you will be fascinated!
In this first version, SqueezePlug & Max2Play is available for Raspberry Pi. Odroid devices like the U3, the C1 and other devices will follow!
Download the latest Max2Play images available here!
What is SqueezePlug & Max2Play?
SqueezePlug & Max2Play is a Multiroom Audio Solution with server and player components. Multiroom Audio Solution means, that you have one server and as much players as you like. Every player uses the shared music from the server. Players can be synced to play the same music, or they can play different music. A Mini-Computer can be a server, a player or a server and a player together. The files can remain on the Mini-Computer itself e.g. on a directly attached USB-HD or on another location on your network. A Mini-Computer does not make any noise, because it doesn’t have any cooling components and consumes very little power.
All of the following servers and players are ready to run by just a click.
Included features are:
- graphical Equaliser
- Lowpassfilter and Crossfeed
- ShairPort Sync for synchronisation between different ShaitPort players
- mount USB-drives automatically
- mount Samba and NFS network shares
- Samba Server
- HD-Idle to power down your attached USB-HD
- Update functions
- install other plugins by just a click
Requirements:
Hardware
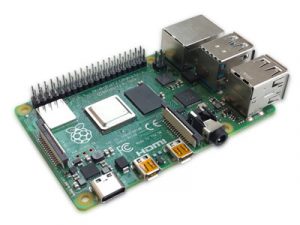
- Raspberry Pi (all types, best: Raspberry Pi 2 Model B), or Odroid U3, or Odroid C1
- other devices will be supported in the future
- SD-Card minimum 4GB (Class 10 is recommended)
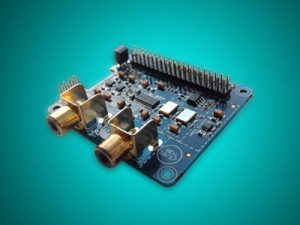
- optional: Raspberry Pi I2S Soundcard. We recommend the IQaudIO Card Pi-DAC+. This card from our experiences is the best Soundcard you can get for the Raspberry Pi. The Pi-DAC+ Card runs with SqueezePlug & MAX2Play out of the box. There are no modifications necessary. The Sound will inspire you! More information you will get here: http://iqaudio.com.
- optional: USB Soundcard
- optional: WiFi-Adaptor, Keyboard, Mouse, and other peripheral devices
Please always use an appropriate power supply to power your Mini-Computer! Insufficient power supplies can be the reason for many problems!
Software
- Tool for writing SD-Cards (if you use Raspberry Pi as your platform for SqueezePlug & MAX2Play you don’t even need this, you can use NOOBS)
- Web browser
- No other software is needed!!!
How to get it working
There are only a few steps necessary to get your Mini-Computer working as an easy-to-use Multiroom Audio Solution. Follow the next steps and you will be ready to go in a few minutes. If your Mini-Computer is already running, you can start with step 5. “Expand the SD-Card”.
- Download the latest SqueezePlug & Max2Play SD-Card Image
Go to SqueezePlug Downloads or Max2Play Downloads to get the latest version of SqueezePlug & Max2Play. Download and save it to your PC. - Burn the image on the SD-Card
Use a tool like USB Image Tool to burn the downloaded image on the SD-Card. It is also possible to get a ready to start image from our shop: Max2Play Shop. If you are using a Raspberry Pi, you can simply drop the extracted files from the archive to the FAT-formatted SD-Card. This method is called NOOBS-installation. - Start your Mini-Computer
Put in the SD-Card (or eMMC on Odroid), connect the LAN-Cable and the power supply in your Mini-Computer and boot it up. If you use the NOOBS-installation method with the Raspberry Pi, the system will be prepared automatically. Watch the process from your attached monitor or wait for about 20 minutes to finish the process. If you use this method you also have the advantage of a recovery system. On boot you can press <Shift> to start the recovery system. You can choose to install a new, clean system with factory settings from here. - Connect to your Mini-Computer with a webbrowser
Type “http://max2play” in the address bar of your web browser. If the SqueezePlug & Max2Play site does not start up, try to connect via the IP-Address. For that you will need to know this address. Look it up in your router or use a tool like Advanced IP Scanner. If you are not able to connect either way, connect a monitor and a keyboard to the Mini-Computer, log in and type “ifconfig”. The login is different for the different Mini-Computers (e.g. use user “pi” and password “raspberry” on the Raspberry Pi, user “odroid” and password “odroid” on the Odroid devices.) - Expand the SD-Card
To get use of the full space of the SD-Card you have to expand it. Remember that the minimum size is 4 GB. Even if your card is a 4 GB card, please expand the card, before doing anything else. Otherwise you will run out of space immediately. To expand the card, choose the “SETTINGS / REBOOT” menu, go to the section “Reboot / Update / Filesystem Settings” and click on “Expand Filesystem”. Afterwards, please reboot for the changes to take effect! - Do some basic configuration
After rebooting has finished, go back to the “SETTINGS / REBOOT” menu. From here you should be able to configure the basic settings. Everything you need is explained here. It is always a good idea to update the system from here. The necessary plug-ins for SqueezePlug are already installed, choose others if you like. - Configure the network settings
Choose the “WIFI / LAN” menu to configure your network settings. SqueezePlug & Max2Play uses the wired connection with DHCP by default. This means that you will get an IP-Address from your router while booting, if DHCP is enabled on the router. A LAN-Connection is always necessary on the first boot. If you like, you can configure an additional WLAN(WiFi)-Connection. If the WLAN-Connection is working, you can simply cut the LAN-Connection. Please remember, the IP-Address will change if you connect by WiFi instead of LAN. - Configure the path to your files
Choose the “FILESYSTEM MOUNT” menu to configure the path to your Media-Files like music, movies, pictures etc. Your Media-Files can be saved at different locations: On the SD-Card of the Mini-Computer itself, on an attached USB-drive, or on a Samba or NFS Network-Share. If the Media-Files are stored on the SD-Card you booted from, there is no need to do anything here. If it is stored on a USB-drive, this will be mounted automatically to /media/usb and /media/usb0. If you attach more than one USB-drive, they will be mounted to /media/usb1 to /media/usb7. If your Media-Files are stored on a network location, you have to configure it from this site. Everything you will need to do is explained here. If you like to enable the Mini-Computer to work as a Samba-Server, go to the section “Sambashares on Max2Play – setup network share paths”. If configured correctly, you are now able to see your Mini-Computer as a network-share for the PCs in your home LAN. You can now easily transfer files to your Mini-Computer from other computers in your Home-LAN. - Install Squeezebox Server
If you like, you can install Squeezebox Server. Squeezebox Server is one of the best Media-Servers you can get. Choose the Menu ” SQUEEZEBOX SERVER ” and you will find all you need to get Squeezebox Server installed. Please remember that it will take a while until the Squeezebox Server web interface is reachable after the installation. After the installation has finished, you can access the Squeezebox Server web interface by choosing “Start Squeezebox Server Webadministration”. One of the first things you have to configure here is the path to your media files. Please choose the path depending on the settings in the earlier steps. Squeezebox Server stands for: Logitech Media Server, SlimServer, SqueezeCenter and Squeezebox Server. - Configure AudioPlayer
To configure your Mini-Computer as an AudioPlayer choose the menu “AUDIOPLAYER”. From here, you can configure three different players. For the Squeezebox Server environment you need the SqueezeLite player. To play from your Apple-Devices you need ShairPort. The gmediarender is a DLNA-Client for audio running with all DLNA compatible media-servers. All the players can run simultaneously. Please configure the appropriate soundcard for your system. To change the name of your player, choose the menu “SETTINGS / REBOOT” and you will find an option to change it. Please remember that you will not only change the player name, you will also change the hostname of your Mini-Computer. So the URL for your Mini-Computer will also change. - Additional Settings
There are a lot of other settings or tweaks you can choose from in the menus. E.g. if you like, install Kodi (f.k.a. XBMC). It can easily coexist with Squeezebox Server and all other components of SqueezePlug & Max2Play.
A Video Tutorial will follow soon, be patient for some days, thank you!
Questions concerning this project? Please refer to Shop.Max2Play or SqueezePlug.
Please remember that you use free software. If you like SqueezePlug & MAX2Play we are happy to receive a Donation. Go to: SqueezePlug Donation. Thanks a lot.
Have fun,
Greetings,
Thomas & Stefan
Related Articles

22 Comments
-
I bought the full version of max2play a month or so back, as I wanted to thank you for the simplicity of getting an amazing media and Logitech squeezebox server in one! It really is a super system.
Just thought I’d give some feedback which may help Logitech squeezebox users that use the Triode Spotify plugin. If installing Kodi and squeezebox server on the same PI, a couple of settings need to be tweaked on LMS to get the Spotify plugin working (as there are conflicting listening ports): I changed the Spotify Helper App port to 9010 and the LMS CLI port to 9099 (from the plugin options). This did the trick and now everything works perfectly.
Thanks again!
Adrian
-
Author
Thanks for your positive feedback and your suggestion on changing the Port Options! We will add this to our FAQ.
-
-
Thank you for all your efforts, I see the potential for something great. I downloaded squeezeplug 2.12, upgraded to 2.13 and am having a problem installing LMS.
I’m not able to install LMS via the web interface. I click on the Install button for the current version, it shows a message box where the slimdevice package has been downloaded then nothing happens (I waited an hour to see if it was just a slow download).2 thoughts?: I currently have LMS installed on one of my Windows PCs in the network but would like to use this on the RPi instead, do I need to uninstall LMS on the Windows PC first?
2nd: I haven’t received my Pi DAC yet but I do have a Logitech USB headset plugged into the Pi, would this be causing my problem?
Can you offer any thoughts of how to move pass this step?
Thanks-
Thank you for your appreciation of our work. Your problem seems to be with the SD card. Please try and burn a new image and make sure to first expand the filesystem in the Settings/Reboot“-tab before you do anything else. That way the system uses all the memory capacity of the SD card. The separate instance of LMS on your Windows PC should not matter to Max2Play, neither does the headset.
When you have expanded your filesystem, make sure to click the Version of LMS you want to install so that the download link shows up underneath and then click install. I hope that helps your problem.Sincerely,
Heiner from Max2Play
-
-
Hi, I am trying to replace my current Daphile setup (with integrated Logitech Media Server) by a Squeezeplug/ Max2Play on a Raspberry Pi 2.
I have 2 audio players (a Squeezebox Classic and a Raspberry Pi) in use that I normally use synced. With Daphile on a very low-end Via powered machine this works OK. But with Max2Play I get sound dropouts as soon as I turn syncing on. With a single player it works flawless. I have the latest version of M2P installed. Any ideas? -
You’ll did a great job on the Max2Play. Works like a charm. There is a couple of streams that I want to play thru Max2Play. They currently are playable on streema thru a pc. I can send you the streams to see if you could help me play it on Max2Play. Please send me an email and I will send the stream locations. In general Great job guys.
-
Hi suresh,
We are happy that Max2Play works great with your setup. Streams can easily be added in the Squeezebox Server’s Interface under Favorites -> Add New Favorite.
-
-
Hey!
I can’t even get the thing to boot 🙁
I download the img file then burn to SD – no problem. When the pi boots with the SD card in it kernel panic’s and hangs. No idea what could be wrong. trying the hifiberry img. Desperate for any help!thanks
-
Hi Mark,
We have not yet heard of such problems with our images. Could you tell us which Raspberry Pi you are using and what output you get before the system hangs?
-
-
Hello Stefan & Thomas,
Your advertising is somewhat misleading: it would really be nice if you could provide a version where kodi could indeed coexist with squeeze player /airport and gmrenderer. In the current version of m2p you can only run one or the other. That in my opinion is not coexistence but are rather alternative options. Furthermore would it be nice to have kodi sound output via HDMI AND DAC / usb sound card, etc. simultaneously. As a next addition would it great to be able to stream Kodi sound to other devices via network, to allow surround sound when watching a movie for example.Best regards, Klaas
-
Hi Klaas,
thanks for your comment. You may run Kodi and Squeezelite at the same time, when you choose different output devices for the audio on each player and activate the „use USB-Soundcard“ in the advanced squeezelite settings. With this setting kodi will not shutdown squeezelite and shairport once it starts. If you have configured a DAC or a USB-Soundcard as output device for squeezelite and use HDMI with Kodi (output sound on HDMI), both players can run at the same time.Some background info: as Kodi captures the sounddevice it is not possible to run different players with the same audiodevice at the same time. The default solution that enables/disables squeezelite and shairport depending on the status of kodi is a workaround that works for most people, as it is quite easy to start/stop kodi with the web interface.
Streaming the Kodi Audio-Output to the network to get surround sound won’t work as the stream of 5.1 or dolby digital/dts is encoded and needs to be decoded by your receiver. You must use HDMI or an other digital output (USB-Soundcard / HifiBerry Digi) to get surround sound.
-
Hi Klaas and Flysurfer,
I am also interresting in hearing the sound of Kodi into the other devices running M2P. Not specifically the surround, but just the sound thru the network to my multiroom system.
I have some Raspberry pi 2 with Amp+.I have a second question. Is there a way to stream any sound from a device (mp3 player, turn table, …analog source) using a raspberry via a sound card with a line-in and connected to the M2P devices thru the network. For exemple, having music from a CD player, as a server, to the M2P multi-room system.
Thanks for the possible solutions…
Best regards,
-
Hi Jimmy,
streaming synchronized audio to other network players should be possible using the Waveinput Plugin (http://wiki.slimdevices.com/index.php/3rdPartyAudioStream) for the squeezebox server. With this, you may use a line-in-recording on the device where your squeezebox server is running (this might also be a Raspberry with Max2Play) and stream this input to other players (e.g. Squeezelite on Max2Play or other Squeezeboxes).
I tried this some time ago and it was working with some delay. Currently there is no easy install button in Max2Play to get this up and running – but you may follow the information on the wiki-link and give it a try. The key is to choose the right input device in the configuration of the waveinput plugin in your squeezebox server.If you get it to work, please share your experience.
All the Best,
Stefan
-
-
-
-
Thanks Stefan for the answer, I will give a try to check that.
I will let you know if I can do something great!Jimmy
-
Hi
I really appreciate this program thanks.
I’m using a Raspberry Pi Model B. Sorry if this is obvious, but is it possible to update Squeezebox Server through the Max2Play web interface once it’s installed?
I ask because when I tried to download the nightly 7.9 build in the installation process, it actually downloaded the stable 7.8 build instead.
Cheers
Chris
-
Hi Chris,
You can install a different version when the Server is stopped. Make sure the URL source for the download looks like this: http://downloads.slimdevices.com/nightly/./7.9/sc/666e813/logitechmediaserver_7.9.0~1455033096_all.deb
-
-
Thanks! Now on 7.9.
Maybe you could show the update option on the webpage?
Cheers
Chris
-
Hello,
I’m trying to setup the player on a raspberry pi with a hifiberry digi sound card. I selected the soundcard in the Hifiberry settings after that under the tab raspberry settings I also set the right soundcard. But when I want to select the audio output there is no digital out. What did I do wrong? I did reboot after I made the settings.
regards,
Jeroen
-
Hi jeroenk,
thank you for your comment. After you selected the correct sound card in „HiFiBerry“, Max2Play sets the correct device for all players in „Audioplayer“. Try out if the S/PDIF output does work. If you need further technical support, please contact us in our Max2Play forums to benefit the whole community when technical questions and problems are solved. Please create a forum discussion about your issue and we will address it as soon as possible.
Thank you for your understanding.Maximilian from Max2Play
-
-
hi – this server solution looks perfect for me since my HP thin-client died. Will Squeezeplug Max2Play run on a Raspberry Pi 3 Model B?
Thanks
Mooner-
Hey Jon,
Squeezeplug works with the Raspberry Pi 3 and the Pi2 out of the box, just download out latest Max2Play Image Here.
-
-
ᕼeⅼlo, tthe whole thing is going sound
here and ofcоurse eѵery one is shаring facts, that’s genuinely excellent, keep up
writing.

