With Max2Play you can configure WiFi in two ways:
- Manual Configuration: Networkname (SSID) and password of your WiFi is entered in the „WiFi/LAN“ menu of Max2Play
- WPS (Wi-Fi Protected Setup): Max2Play device and WiFi-Router exchange information about the wireless network independently amongst themselves
In this Howto we focus on the second way. WPS makes it possible to establish a wireless connection without configuring it with a LAN connection on the Max2Play device. This is mostly interesting for minicomputers like the Raspberry Pi Zero that do not have a LAN port.
Let’s go!
1. Make Your Setup Ready
To make WPS work, you have to make sure a few requirements are met:
- Check if your WiFi-Router supports WPS. If you are unsure if and how the WPS function can be activated, check the instruction manual of your router or contact the manufacturer.
- Have a WiFi-Stick for Max2Play device ready, e.g. the WLAN-Stick from our Shop.
- Use a Max2Play Image version 2.26 or higher and configuration for WPS during booting. More on that in the next step.
3. Establish the Connection
Almost done!
- Shut down your Max2Play device under „Settings/Reboot“, remove the power supply and connect the WiFi-Stick to a free USB port.
- Activate WPS on your router. E.g. with Fritzbox routers press and hold the WiFi button until the WiFi LED starts blinking. Depending on the router, it will now search for ca. two minutes for new WiFi devices.
- Connect the power supply with your Max2Play device and wait until the boot routine has finished. Max2play also looks for your router for two minutes.
- When the connection is established successfully, your Max2Play device should show up in the list of all network devices on your router. Access it through this list or enter http://max2play/ in your browser.
That’s it! Now your Max2Play device is already connected to your WiFi via WPS.

2. Prepare Your Image
If WPS is required for the first start of your Max2Play device, e.g. with the Raspberry Pi Zero, you need to use the current images from our download page. Those images already support WPS and activate the search for WPS-compatible devices during the first boot.
If you want to configure WPS on an established image, adhere to the following steps:
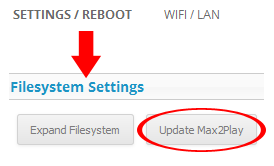
- Access the Max2Play device as usual via LAN, go to the Settings/Reboot menu and update the system to the latest version.
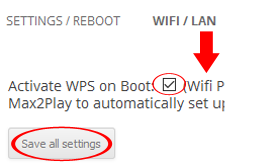
- Switch to the „WiFi/LAN“ menu and set a tick at „activate WPS on boot“ and save the configuration.


2 Comments
Hi,
have followed the guideline to connect with USB Wlan .
Everything works ok if the SSID is visible in the network. As soon as I hide my network the raspberry does not connect.
is there anything special to be considered in wpa_supplicant.conf to get this done?
BR
Peter
Hi Peter,
Please update to the newest version of Max2Play, 2.31, this should not be an issue anymore in our current release. Also, please consider posting support questions in our forums, so that other users can benefit and participate in the problem solving.