„Hey Siri. Turn music on at home!“
In this how-to, we show you how to configure voice control of your Max2Play device in a few steps with voice assistant Siri on Apple iOS devices. At the end of this tutorial, you can start music playback via Squeezelite Player in Max2Play with the voice command „Turn music on at home“. Let’s go.
1. Install Max2Play Plug-in Voice Control
Install the plug-in „Voice Control“ on your Max2Play device by pasting this download link into the „Settings/Reboot“ menu of the Max2Play interface and clicking „Install new plugin“. After the installation, the menu „Voice Control“ appears in the interface. The plug-in is also available at our plug-in page.
To control the Max2Play device, the house automation system HomeKit by Apple is required. We are going to install it in the next step.
3. Link HomeKit with Max2Play Device
As soon as the log-in screen appears, enter „admin“ as name and password as described. If you want, you can set your own password at first. To do that, click on the red gear at the top-right corner, choose „My Settings“, enter a new password at the end of the page and set it by hitting the „Submit“ button.
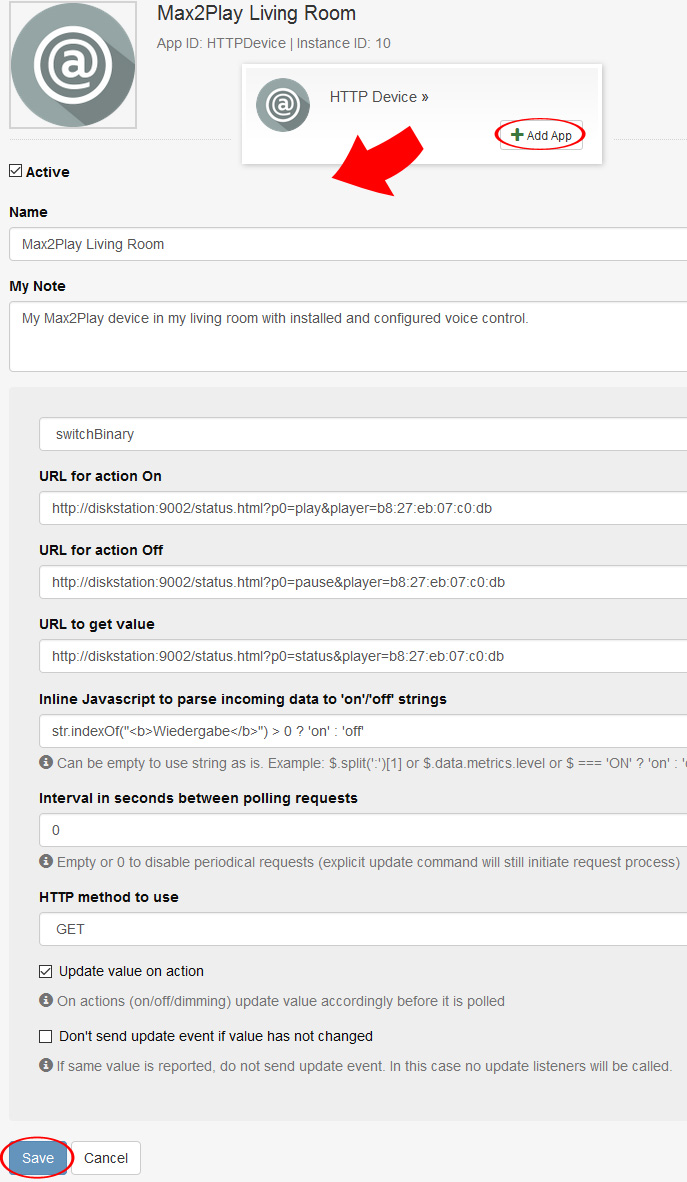
Click on the red gear again now and choose „Apps“ to open the overview of all apps. At first, we are focussing on a „HTTP Device“. After clicking on „Add App“, you have to enter some information about your Max2Play device. At „Name“, you should use a meaningful name, e.g. „Max2Play Living Room“. To stay on top of things, this name should match the name of your Max2Play device in the „Settings/Reboot“ menu. You can leave the field „My Notes“ blank. Choose „switchBinary“ in the next field.
Next in the line are the three URls and some JavaScript code containing the control commands of your Squeezeliteplayer. Note that the player has to be controlled by a running Squeezebox Server by all means with this setup. If there is no in your network, install one directly in the „Squeezebox Server“ menu on your Max2Play device. You can look up the commands easily in the „Voice Control“ menu of Max2Play. By the way, these links begin with the IP address end with the MAC address of your Max2Play device, the LAN port or WiFi adapter. When making the switch between these, keep in mind to enter the the current URLs from the Max2Play interface in each case. If you use a Squeezeboxserver beyond your Max2Play device, you have to enter its IP address of course. Copy the URLs to start, pause and request the status of the Squeezelite Player into the three corresponding fields and the JavaScript code into the field „Inline Javascript(…)“.
Keep the preconfigured request interval. Please choose „GET“ as „HTTP method to use“, additionally, check the option „Update value on action“. Leave the second checkbox unchecked. Please click on „Save“ to create the HTTP device.
4. Configure your iOS device
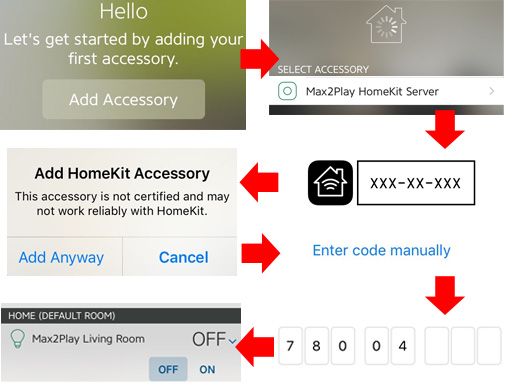
To use HomeKit on your iOS device, please install a HomeKit-capable app, a free example is Elegato Eve.
Once the app is installed successfully, open it and hit „Add Accessory“. Set a name for your home and wait while the app is looking for the HomeKit Gate we set up before. Press on its name and on the PIN area on the next screen. Ignore the message that this not certified HomeKit accessory might not work reliably, and press „Add Anyway“ and „Enter code manually“. Enter the row of numbers from the Max2Play interface into the PIN prompt to complete the pairing of your iOS and Max2Play device. The http device should be found automatically now by your iOS device. Optionally, you can assign a Siri name and a room.
After completing all these configuration steps, you can turn on and off the Squeezeliteplayer on your Max2Play device with voice commands.
6. More Use Cases
In the Max2Play interface, „Voice Control“ offers a list with more important URL commands you can again configure as further „HTTP Devices“, e.g. to start and stop Kodi and Jivelite or to shut down your Max2Play device.
Keep in mind that you can find out those URL commands quickly on your own by pushing a button in the Max2Play interface and look after the URL command that is shown after it was executed. for the URL command shown after its execution. For example, click on „Update Max2Play in the „Settings/Reboot“ menu to receive a URL with the command „action=checkMax2PlayUpdate“.
How to configure voice control on an android device, you can look up in „How-to – Max2Play Voice Control with Google Voice Assistant Google Now“ (available soon).

2. Install HomeKit
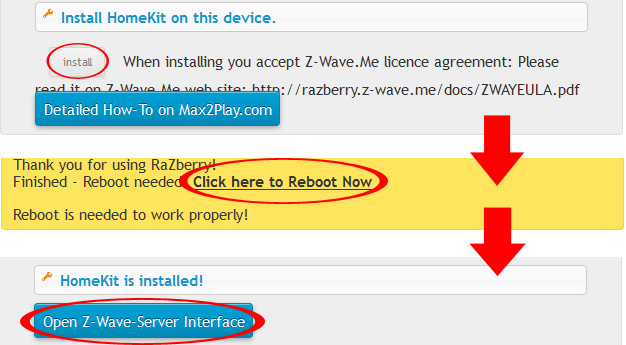
Click on „Voice Control“ in the Max2Play interface to open the plug-in. Expand the section „I have a Apple Device (iPhone / iPad) with Siri“ to install HomeKit in a few minutes. Finally, the Max2Play device must be restarted. The fastest way is to click on „Click here to Reboot Now“ in the yellow info box. HomeKit is now ready for action.
Click on „Open Z-Wave Server Interface“ to access HomeKit. We are going to configure some settings there to link your Max2Play device with HomeKit.
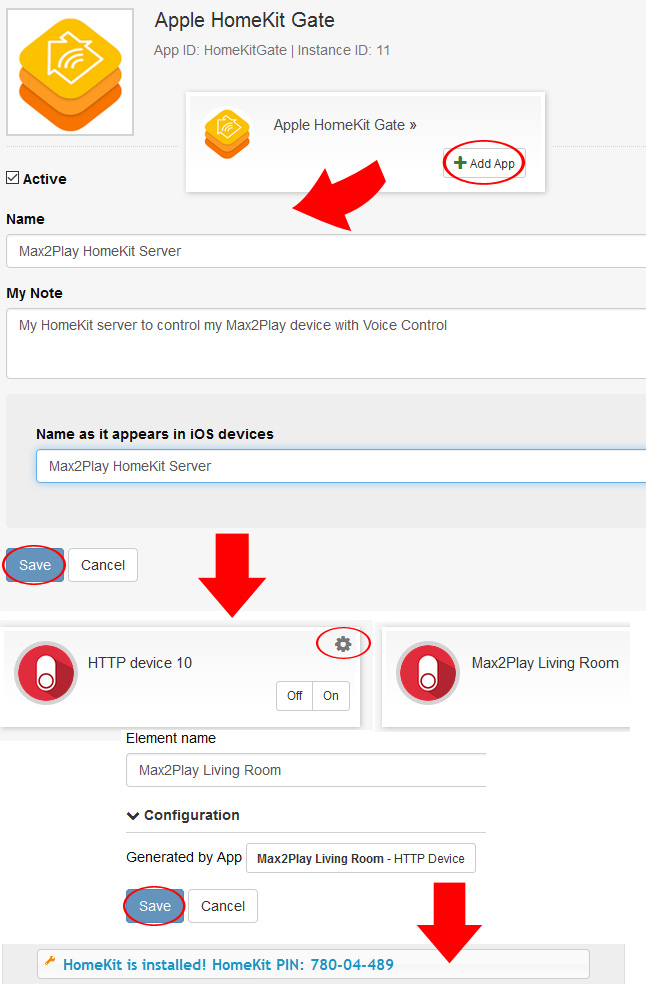
You find yourself back again in the app overview now. Create a new app, „Apple HomeKit Gate“ right after „HTTP Device“, by hitting „Add App“. At „Name“ and at „Name as it appears in iOS devices“, you could enter „Max2Play HomeKit Server“ for example, „My Notes“ is optional. Click on „Save“ to create the „Apple HomeKit Gate“.
Next step is to hit „Elements“, the menu right next to the little house button („Dashboard“), and look for your http device. If you cannot see it, reload the page by hitting the F5 key. The http device does not automatically carry over the name of the app we created before. If this bothers you, click on the gear of your http device and type out the field „Generated by App“ for example. Click „Save“.
Switch over to the Max2Play interface. In the Siri section, a HomeKit PIN is automatically shown after setting up a HomeKit Gate. We need this PIN to configure your iOS device.
5. Usage of Voice Commands
Activate Siri as usual by pressing the home button of your iOS device for a while and speak: „Turn music on at home“. If you set up the „Hey Siri“ command available since iOS 8, this also work of course. Shortly after, the Squeezelite Player on your Max2Play device should be started and play music. Please don’t get confused: Siri might tell you she switched a lamp on. With the command „Turn music off at home.“, you trigger the stop of the Squeezelite Player. In the background, the embedded URLs are called that we entered before.
Very good. You can simply tell your iOS device whether Max2Play should play music or not. Beyond that, Max2Play offers many other use cases you can control the same way with voice control.


13 Comments
How soon is soon for the Google Now (now Google Assistant) instructions?
The pictures and combination with the text are not right. How should i read this?
Hi sven,
Thanks for the feedback. Please post what device and browser you are using in our forums so we can try to recreate the issue.
I get a error with the installation.
gyp WARN EACCES user „root“ does not have permission to access the dev dir „/usr/local/lib/node_modules/homebridge-server/node_modules/mdns/.node-gyp/8.4.0“
gyp WARN EACCES attempting to reinstall using temporary dev dir „/usr/local/lib/node_modules/homebridge-server/node_modules/mdns/.node-gyp“
Hi sven,
That part of the installation sequence should not impede on the success of it. You should still have received an end indicating a successful installation and the blue text should say „Homebridge is installed!“. If this is not the case, please create a new topic in the forums and detail your steps so we can find out what went wrong.
Nice plugin! Are you working on Google Assistant integration?
Hi Niels,
Thanks for the kind words. We are currently not working on a Google Assistand integration. However, if you request it in our forums and other users agree, we will consider adding this.
Dear Max2Play team,
were do I find the plugin? I’ve found ‘Speech Control’ but no ‘Voice Control’ in the plugin list? Is this plugin deprecated?
Thanks for keeping Max2Play running,
Tim
Hi Tim,
This is in fact the plugin question. However, this is a beta version without active development.
any way of using Google assistant instead?
Hi Mika,
Unfortunately no out-of-the-box solution. You can have a look at any Raspbian Stretch project implementing the assistant and try it out in Max2Play, though.
Hello dear Max2play team!
Thanks for your work! that’s great!
I have a problem with my installation : I installed speech control and i can’t use it on my iPhone Apple Homekit app. I can’t do the step 3 of your tutorial because I think the version of Speech control has changed.. Can you make an update of your tutorial?
Thanks a lot!
Best regards
matt
Hi Matt,
Thank you for the kind words!
Our Voice Control plugin is unfortunately a very early alpha version which we are still evaluating.
If you want us to prioritize the development of this plugin, please let your voice known in our development forum. If other users agree with you, we will put it on top of the list 😉