Forum Replies Created
-
Posted in: Allo USB Bundle
-
5. Juni 2020 at 9:36 #48946
Could it be related to version of IO::Socket::SSL ?
Just yesterday, a Max2play 2.52 (Mar 2020) system based on Jessie with IO::Socket::SSL: 2.002 (released in 2014 ! ) failed to access some https metadata connections. The same system had OpenSSL of 1.0lts.
28. April 2020 at 19:06 #48652Just managed to check:
All images can also be downloaded from my LMS-hosting Synology NAS using wget.
I had to put quotes around the complex discogs-url, but yes it also worked.28. April 2020 at 18:33 #48650Of course it is also a problem that I updated several things at once. Including LMS792 to LMS800 (I’m using Pinkdot’s LMS distribution: https://forums.slimdevices.com/showthread.php?111876 ).
It is easiest to suspect Jivelite, but I guess it would have been much better if I had taken my updates steps by step and verified everything a couple of days between steps :-/ …PS. Discogs-image link in previous comment works for me now here in this forum.
28. April 2020 at 18:24 #48649Hi MarioM
I’m very grateful if you take the time to recreate my setup to help. Even if it takes some time.
I see my discogs image link doesn’t work. It is also a very long and complex address, maybe the forum software f*cked it up. I try again:But doesn’t the other links I have posted works for you? They work for me in this forum too:
https://m.media-amazon.com/images/I/414x7CvevDL.jpg (Works everywhere for me except RPi3)
https://m.media-amazon.com/images/I/414x7CvevDL._SL300_.jpg (Works everywhere for me except RPi3)
https://is2-ssl.mzstatic.com/image/thumb/Music123/v4/2f/f6/39/2ff63936-6cd0-01b1-efb1-06a5ed671cab/source/200x200bb.jpg (Works everywhere INCLUDING on RPi3)The following one also works for me, including on the RPi3. For some reason LMS in this case decided to cache it via it’s own proxy. I don’t know when that happens and when it doesn’t? But when it is shown like that in LMS webinterface, it also shown on the RPi3. But Of course this link doesn’t work for you, because it points to my local „intranet“ LMS:
http://192.168.1.151:9002/imageproxy/https%3A%2F%2Fimages-na.ssl-images-amazon.com%2Fimages%2FI%2F61woa6C3PCL._SL300_.jpg/image.jpgAll the image URLs I have posted is taken from LMS web-interface ( = Squeezebox Server web-interface) by right clicking the shown artwork. Of course I don’t know if is the exact same URLs which are sent to the various devices. If it makes a difference, please also notice that I’m running LMS on a Synology NAS, not on the RPi3. The RPi3 is a player only. I will try to find out to do a wget on the Synology too…
/Stig
26. April 2020 at 20:24 #48622While playing Dandelion radio from the http://www.dandelionradio.com/DandelionRadio.pls stream, I noticed my RPi3 wont show the cover-art embedded from Discogs either. F.ex: this one ain’t shown:
https://img.discogs.com/wBpvmHQHXOvMUbKE-IdWamolUf0=/150×150/smart/filters:strip_icc():format(jpeg):mode_rgb():quality(40)/discogs-images/A-1741195-1427667902-1010.jpeg.jpg
Dandelion is new station for me, but I’m pretty sure it had cover-arts the first time I listened to it.
So I tried looking at headers when using curl (on my PC) to fetch some cover-art my RPi3 will show and some it wont show:
My RPi3 WORKS with images from is4-ssl.mzstatic.com, like:
C:\Users\Stig>curl --head https://is4-ssl.mzstatic.com/image/thumb/Music/v4/7f/a6/96/7fa696d6-c736-d7ef-67d5-fc6d9d432461/source/200x200bb.jpg
HTTP/1.1 200 OK
Server: ATS/8.0.7
Content-Type: image/jpeg
Content-Length: 25986
X-Apple-Jingle-Correlation-Key: LZ5BTQSMCYRU6OV3N37EUG37NM
X-Apple-Request-UUID: 5e7a19c2-4c16-234f-3abb-6efe4a1b7f6b
apple-seq: 0.0
apple-tk: false
Apple-Originating-System: UnknownOriginatingSystem
Last-Modified: Sat, 25 Apr 2020 04:51:50 GMT
ETag: "FDdRKLBuVYxmcanAoUBerA=="
Access-Control-Allow-Origin: *
Access-Control-Expose-Headers: Content-Length,Content-Type,ETag,Cache-Control,Expires,Last-Modified
Strict-Transport-Security: max-age=31536000; includeSubDomains
x-daiquiri-instance: daiquiri:13624002:mr85p00it-hyhk03094901:7987:20E24
CDNUUID: d510cb70-168a-477f-9ae0-dc1a618cd34a-967962253
Cache-Control: no-transform, max-age=14464339
Date: Sun, 26 Apr 2020 18:01:39 GMT
X-Cache: TCP_MISS from a95-100-154-37.deploy.akamaitechnologies.com (AkamaiGHost/10.0.0.1-29304580) (-)
Connection: keep-alive
X-Cache-Remote: TCP_MISS from a2-16-128-197.deploy.akamaitechnologies.com (AkamaiGHost/9.9.4.2-29290934) (-)
But it DOESN’T WORK with images from m.media-amazon.com or img.discogs.com, like:
C:\Users\Stig>curl --head https://m.media-amazon.com/images/I/51MO0of2EiL.jpg
HTTP/1.1 200 OK
Connection: keep-alive
Content-Length: 63037
Content-Type: image/jpeg
Expires: Fri, 09 Mar 2040 09:25:04 GMT
Cache-Control: max-age=630720000,public
X-Amz-IR-Id: c808de4f-73d1-4a64-ae7c-141a9a7be577
Timing-Allow-Origin: https://www.amazon.in, https://www.amazon.com
Access-Control-Allow-Origin: *
Last-Modified: Thu, 03 Nov 2016 22:53:15 GMT
Accept-Ranges: bytes
Date: Sun, 26 Apr 2020 18:21:10 GMT
Age: 297202
X-Served-By: cache-dca17751-DCA, cache-cph20639-CPH
X-Cache: HIT from fastly, HIT from fastly
C:\Users\Stig>curl --head https://img.discogs.com/wBpvmHQHXOvMUbKE-IdWamolUf0=/150x150/smart/filters:strip_icc():format(jpeg):mode_rgb():quality(40)/discogs-images/A-1741195-1427667902-1010.jpeg.jpg HTTP/1.1 200 OK Connection: keep-alive Content-Length: 3880 Cache-Control: max-age=315360000,public Content-Type: image/jpeg Etag: "007a18b23a1116239cb7f3d4cd758985e771dbce" Expires: Sat, 06 Apr 2030 08:34:42 GMT Server: nginx/1.16.1 Via: 1.1 varnish Accept-Ranges: bytes Date: Sun, 26 Apr 2020 18:22:21 GMT Via: 1.1 varnish Age: 1590458 X-Served-By: cache-sea4460-SEA, cache-cph20631-CPH X-Cache: HIT, HIT X-Cache-Hits: 1, 1 X-Timer: S1587925341.165648,VS0,VE1I’m not an expert in those headers. But I don’t think there’s anything very suspicious here?
I’m so lost…
21. April 2020 at 20:00 #48579Hi Mario
Thanks for the response.
The device being blocked by Amazon sounded like a plausible theory, unfortunately/luckily that doesn’t seem to be the issue. I can download from the RPi3 using wget it seems:pi@m2p-livingroom:~ $ wget https://m.media-amazon.com/images/I/414x7CvevDL.jpg --2020-04-21 19:40:07-- https://m.media-amazon.com/images/I/414x7CvevDL.jpg Resolving m.media-amazon.com (m.media-amazon.com)... 151.101.129.16, 151.101.193.16, 151.101.65.16, ... Connecting to m.media-amazon.com (m.media-amazon.com)|151.101.129.16|:443... connected. HTTP request sent, awaiting response... 200 OK Length: 22700 (22K) [image/jpeg] Saving to: ‘414x7CvevDL.jpg’ 414x7CvevDL.jpg 100%[=====================================================================>] 22.17K --.-KB/s in 0.008s 2020-04-21 19:40:07 (2.58 MB/s) - ‘414x7CvevDL.jpg’ saved [22700/22700]Yes album-art is visible on the Squeezebox server web interface – or LMS web-ui as I call it (Logitech Media Server). It is also visible on my original SB-Touch and on Orange Squeeze Android app.
I updated Max2Play to latest 2.52 yesterday, including another Jivelite update it looked like. But no, still no cover-art from m.media-amazon.com. Weird…
If anyone feel like trying the KCRW plugin for LMS, install as described at
https://forums.slimdevices.com/showthread.php?112001&p=971466&viewfull=1#post971466
and play the stream:
http://media.kcrw.com/pls/kcrwmusic.pls/Stig
30. Juni 2017 at 8:35 #29765Just a quick follow-up to tell I finally got this working….
I tried without any luck creating new images in various ways. So ended up ordering a new pre-configured SDcard from M2P which worked pretty much „out-of-the-box“ (I only had to rotate screen and turn off cursor to have a proper working setup).
I have no idea what I have done wrong in my other attempts. I have done various updates now to the new M2P configuration similar to what I think I did with my other images. And it’s still working. One thing I haven’t done this time though, is selecting one of the pre-configured setups on the HiFiBerry tab. So maybe it is a good thing to keep your hands away from this?
Anyway, I have also made sure I got a backup now of a working setup in case I mess it up again 🙂
17. April 2017 at 20:07 #28292Hi Ronald
I got a warning saying something was wrong with my sd-card when inserting it into my Windows PC, and was encouraged to run a check of it. I chose to ignore it, I don’t know if there’s something special about how it is formated for the raspberry pi? Was still able to read content though, including config.txt which did have the dtoverlay line in this block:
# Enable audio (loads snd_bcm2835)
dtparam=audio=on
gpu_mem=128
dtoverlay=hifiberry-digi
lcd_rotate=2
It did however also have the line for onboard sound included which the page you link to tells me to remove. So I have now out-commented the dtparam line.
The change does not seem to do any harm, but still no life from soundcard.
Regarding trying the other stuff you suggests, I think I will continue the path started. At least until I give up 🙂
The kit I purchased should been a proven combi/setup. However documentation is seriously lacking.
The guide we have only tells how to setup with a HiFiBerry DAC+ light (not for my Digi+ Pro). For powering DAC+ the guide shows a setup like this:
explaning the setup with this comment:
Since the two peripheries, screen and sound card, both need a lot of juice to run properly, we need to give the sound card an additional power source in the form of the 5 volt connector on the touchscreen. However we cannot connect the two yet since the connectors on the sound card are only for the Raspberry Pi.
That is why we need to solder a little line of five connectors onto the top of our sound card. We just need two connections for the power supply, the first and third hole, so we only need to solder in two places. Once those two are rightly connected and sit strong on the sound card, we need to bend the connectors a little in order to not have them stick out in our case.
Now that this new ridge is added and conformed to the rest of the system, we just need to connect the two cables and all the hardware is in place.As you see on the photos of my setup (first post and just below here) we have also added the line of five connectors on my Digi+ Pro card, but were unsure which pins was correct to connect on the Digi+ Pro card, since layout seems very different from the DAC+. So we ended out with alternative way shown on photo in first post.
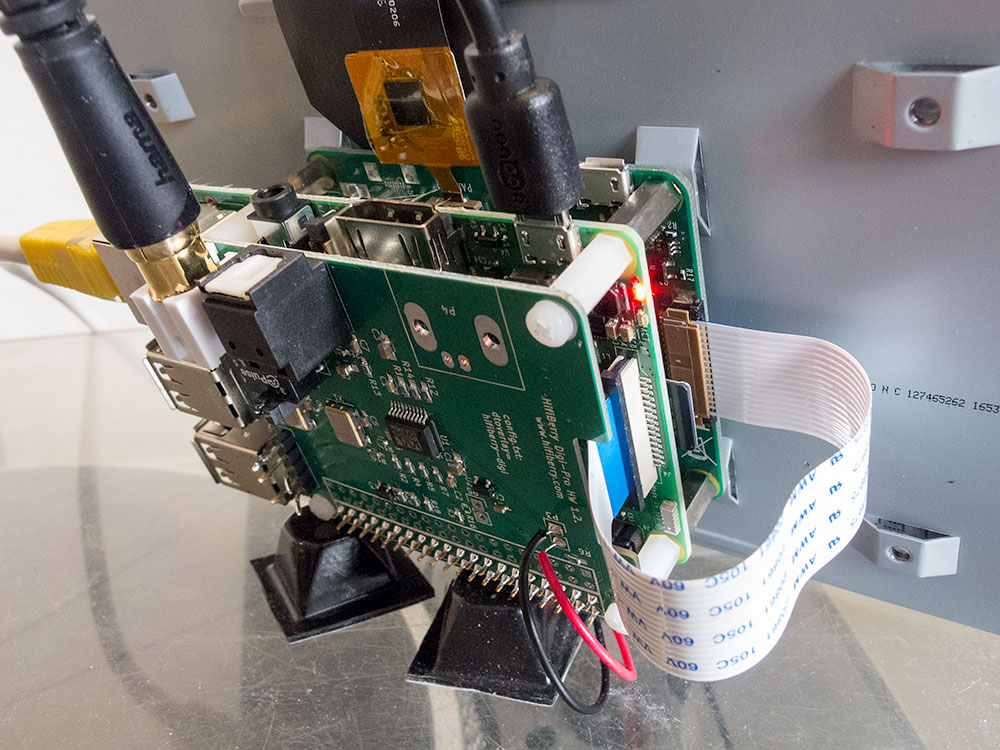
What we really miss is some documentation on the Digi+ Pro card, especially the group called P6. But we haven’t been able to find it anywhere.
Our alternatively approach came from this page:
https://support.hifiberry.com/hc/en-us/articles/213227645-Digi-Pro-power-separately-from-the-Raspberry-Pi
The page tells you how you can power the digital part of the board independently. I guess we assumed that you can also power the whole board from P3 if you just leave the resistor R3 where it is. But that assumption might be wrong?…-
This reply was modified 9 years, 1 month ago by
StigN. Reason: minor
17. April 2017 at 19:58 #28290Hi Ronald
I got a warning saying something was wrong with my sd-card when inserting it into my Windows PC, and was encouraged to run a check of it. I chose to ignore it, I don’t know if there’s something special about how it is formated for the raspberry pi? Was still able to read content though, including config.txt which did have the dtoverlay line in this block:
# Enable audio (loads snd_bcm2835)
dtparam=audio=on
gpu_mem=128
dtoverlay=hifiberry-digi
lcd_rotate=2
It did however also have the line for onboard sound included which the page you link to tells me to remove. So I have now out-commented the dtparam line.
Regarding trying the other stuff you suggests, I think I will continue the path started. At least until I give up 🙂
The kit I purchased should been a proven combi/setup. However documentation is seriously lacking.
The guide we have tells how to setup with a HiFiBerry DAC+ light. For powering the guide shows a setup like this:explaning the setup with this comment:
Since the two peripheries, screen and sound card, both need a lot of juice to run properly, we need to give the sound card an additional power source in the form of the 5 volt connector on the touchscreen. However we cannot connect the two yet since the connectors on the sound card are only for the Raspberry Pi.
That is why we need to solder a little line of five connectors onto the top of our sound card. We just need two connections for the power supply, the first and third hole, so we only need to solder in two places. Once those two are rightly connected and sit strong on the sound card, we need to bend the connectors a little in order to not have them stick out in our case.
Now that this new ridge is added and conformed to the rest of the system, we just need to connect the two cables and all the hardware is in place.As you see on the photos of my setup (first post and just below here) we have also added the line of five connectors on my Digi+ Pro card, but were unsure which pins was correct to connect on the Digi+ Pro card, since layout seems very different from the DAC+. So we ended out with alternative way shown on photo in first post.
What we really miss is some documentation on the Digi+ Pro card, especially the group called P6. But we haven’t been able to find it anywhere.
Our alternatively approach came from this page:
https://support.hifiberry.com/hc/en-us/articles/213227645-Digi-Pro-power-separately-from-the-Raspberry-Pi
The page tells you how you can power the digital part of the board independently. I guess we assumed that you can also power the whole board from P3 if you just leave the resistor R3 where it is. But that assumption might be wrong?…-
This reply was modified 9 years, 1 month ago by
-
This reply was modified 9 years, 1 month ago by
-


:format(jpeg):mode_rgb():quality(40)/discogs-images/A-5825775-1563198450-4446.jpeg.jpg)