Max2Play Home › Forums › Max2Play on Raspberry PI › [SOLVED] No sound from HiFiBerry Digi+ Pro (Max2Play "Squeezebox Touch" kit)
Tagged: digipluspro, HiFiBerry, Sound, Squeezebox Touch
- This topic has 9 replies, 3 voices, and was last updated 8 years ago by
StigN premium.
-
Posted in: Max2Play on Raspberry PI
-
16. April 2017 at 13:14 #28269
Hi
I am trying to get the Max2Play „squeezebox touch bundle“ with Digi+ Pro soundcard to work. But it won’t play.
Everything looks right when I start up the device. I can connect to my LMS server, browse my music collection and also browse in for example Spotify. But when I try to play something (local or radio), it’s getting a bit weird. Seen from LMS‘ browser interface everything looks right. The progress-bar moves along looking like the device is playing. So seen from LMS it looks like the device is playing. When looking at the device’s screen it also first looks like it starts playing (it shows track metadata, albumart and playbutton changes to a pause-button), however the progress bar doesn’t move on the device, and I get no signal to my DAC/AMP (have tried both optical and RCA). So it seems the device is aware it’s not really playing anything.
I have never done a Raspberry project before, I am not familiar with electronics (got a friend to put it together and do the soldering), and actually not a very experienced with Linux either. But hope I will be able to get it to work anyway. I simply wanted one more SBTouch(-like) player for my setup:-)
The first problem is that I’m unsure if it is a configuration-problem or if we have put it together in a wrong way. We had some problems finding out where to connect the power cables between soundcard and the touch display.
We looked at the instructions on http://www.instructables.com/id/High-End-Sound-with-7-Inch-Touchscreen-Control-Bas/?ALLSTEPS when putting it together, however this shows how to set it up with a HiFiBerry DAC+. We were not able to find a more specific guide for the HiFiBerry Digi+ Pro soundcard and was unsure which pins we were intended to use when connecting power between soundcard and display. In the end we soldered the cables to the soundcard’s pin header P3 as shown on photo.

When the device is turned on I see light from a little diode on the raspberry, but no light anywhere on the soundcard. But I don’t know if there’s suppose to be?
Next to the Max2Play software configuration. Looking at the instructions I thought I should do a lot of configuration, and starting to touch a lot of things after booting up on the included microSD. But slowly realizing that pretty much everything was already prepared in the microSD I got in the bundle. I don’t THINK I did much more than run an update on various components. But now that it doesn’t work, an annoying doubt sneaks into my mind. I should of course have taken a backup of the SDcard before I started. But of course, didn’t think about that until afterwards…
Some settings:
Your installed HiFiBerry Card: Hifi Berry Digi/Digi+ (there’s no specific Digi+ Pro option)
Status: Squeezelite is running with processID 870
soundcard: sysdefault – snd_rpi_hifiberry_digi …Status: Jivelite is running with processID 1246
Raspberry Settings – detected Raspberry PI 3
Hifi Berry Digi/Digi+ (again, no specific Digi+ Pro option)Set Audio Output on Raspberry PI
Default (use HDMI if plugged)Anyone who can help?…
16. April 2017 at 14:11 #28274Hi
the settings semms to be right
Is there red light at the optic outout?II don’t know if the cables are right. I have a Higiberry Digi without display. There aren`t any cables.
17. April 2017 at 9:07 #28281Try the installer from hifiberry.com and choose the audioplayer option. The mainpower should be in the 7″ display connector!
Or try to install another mediaplayer like picoreplayer from https://sites.google.com/site/picoreplayer/home and choose your card.
Max2play is more complicated than it looks like because you have a lot of options.
Last tip: read the config.txt file from your SD card on your PC with Wordpad and look for the digi dtoverlay line. If it’s missing, your card won’t work. See
Regards
Ronald
17. April 2017 at 19:58 #28290Hi Ronald
I got a warning saying something was wrong with my sd-card when inserting it into my Windows PC, and was encouraged to run a check of it. I chose to ignore it, I don’t know if there’s something special about how it is formated for the raspberry pi? Was still able to read content though, including config.txt which did have the dtoverlay line in this block:
# Enable audio (loads snd_bcm2835)
dtparam=audio=on
gpu_mem=128
dtoverlay=hifiberry-digi
lcd_rotate=2
It did however also have the line for onboard sound included which the page you link to tells me to remove. So I have now out-commented the dtparam line.
Regarding trying the other stuff you suggests, I think I will continue the path started. At least until I give up 🙂
The kit I purchased should been a proven combi/setup. However documentation is seriously lacking.
The guide we have tells how to setup with a HiFiBerry DAC+ light. For powering the guide shows a setup like this:
explaning the setup with this comment:
Since the two peripheries, screen and sound card, both need a lot of juice to run properly, we need to give the sound card an additional power source in the form of the 5 volt connector on the touchscreen. However we cannot connect the two yet since the connectors on the sound card are only for the Raspberry Pi.
That is why we need to solder a little line of five connectors onto the top of our sound card. We just need two connections for the power supply, the first and third hole, so we only need to solder in two places. Once those two are rightly connected and sit strong on the sound card, we need to bend the connectors a little in order to not have them stick out in our case.
Now that this new ridge is added and conformed to the rest of the system, we just need to connect the two cables and all the hardware is in place.As you see on the photos of my setup (first post and just below here) we have also added the line of five connectors on my Digi+ Pro card, but were unsure which pins was correct to connect on the Digi+ Pro card, since layout seems very different from the DAC+. So we ended out with alternative way shown on photo in first post.
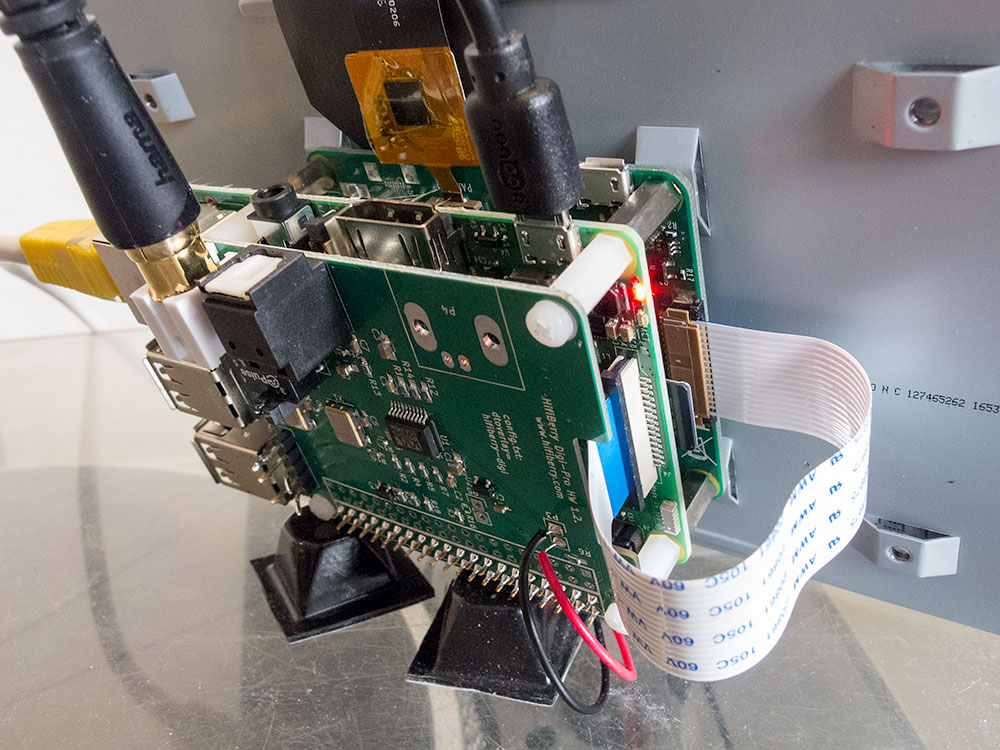
What we really miss is some documentation on the Digi+ Pro card, especially the group called P6. But we haven’t been able to find it anywhere.
Our alternatively approach came from this page:
https://support.hifiberry.com/hc/en-us/articles/213227645-Digi-Pro-power-separately-from-the-Raspberry-Pi
The page tells you how you can power the digital part of the board independently. I guess we assumed that you can also power the whole board from P3 if you just leave the resistor R3 where it is. But that assumption might be wrong?…-
This reply was modified 8 years, 3 months ago by
17. April 2017 at 20:07 #28292Hi Ronald
I got a warning saying something was wrong with my sd-card when inserting it into my Windows PC, and was encouraged to run a check of it. I chose to ignore it, I don’t know if there’s something special about how it is formated for the raspberry pi? Was still able to read content though, including config.txt which did have the dtoverlay line in this block:
# Enable audio (loads snd_bcm2835)
dtparam=audio=on
gpu_mem=128
dtoverlay=hifiberry-digi
lcd_rotate=2
It did however also have the line for onboard sound included which the page you link to tells me to remove. So I have now out-commented the dtparam line.
The change does not seem to do any harm, but still no life from soundcard.
Regarding trying the other stuff you suggests, I think I will continue the path started. At least until I give up 🙂
The kit I purchased should been a proven combi/setup. However documentation is seriously lacking.
The guide we have only tells how to setup with a HiFiBerry DAC+ light (not for my Digi+ Pro). For powering DAC+ the guide shows a setup like this:explaning the setup with this comment:
Since the two peripheries, screen and sound card, both need a lot of juice to run properly, we need to give the sound card an additional power source in the form of the 5 volt connector on the touchscreen. However we cannot connect the two yet since the connectors on the sound card are only for the Raspberry Pi.
That is why we need to solder a little line of five connectors onto the top of our sound card. We just need two connections for the power supply, the first and third hole, so we only need to solder in two places. Once those two are rightly connected and sit strong on the sound card, we need to bend the connectors a little in order to not have them stick out in our case.
Now that this new ridge is added and conformed to the rest of the system, we just need to connect the two cables and all the hardware is in place.As you see on the photos of my setup (first post and just below here) we have also added the line of five connectors on my Digi+ Pro card, but were unsure which pins was correct to connect on the Digi+ Pro card, since layout seems very different from the DAC+. So we ended out with alternative way shown on photo in first post.
What we really miss is some documentation on the Digi+ Pro card, especially the group called P6. But we haven’t been able to find it anywhere.
Our alternatively approach came from this page:
https://support.hifiberry.com/hc/en-us/articles/213227645-Digi-Pro-power-separately-from-the-Raspberry-Pi
The page tells you how you can power the digital part of the board independently. I guess we assumed that you can also power the whole board from P3 if you just leave the resistor R3 where it is. But that assumption might be wrong?…-
This reply was modified 8 years, 3 months ago by
18. April 2017 at 0:40 #28297Hello StigN, there’s really no much documentation needed for using a Hifiberry DAC in combination with a 7″ display. Choose your wanted player (OpenElec, Picoreplayer, Max2Play) and burn an image. Your config.txt file must contain the dtoverlay=hifiberry-digi and that’s it. Don’t remove any resistor! Your original RaspberryPi power supply is enough to feed.
The ledlight of a hifiberry starts burning when you use it for audio output.
I have my powersupply connected directly on the 7″display. Then it’s powered like your design directly on the Hifiberry DAC. I use a PicorePlayer image with Jivelite and a squeezbox server (very easy to install with picoreplayer.local on your browser and an ethernet connection on the Raspberry Pi).
If it doesn’t work just start again with a new image!
30. Juni 2017 at 8:35 #29765Just a quick follow-up to tell I finally got this working….
I tried without any luck creating new images in various ways. So ended up ordering a new pre-configured SDcard from M2P which worked pretty much „out-of-the-box“ (I only had to rotate screen and turn off cursor to have a proper working setup).
I have no idea what I have done wrong in my other attempts. I have done various updates now to the new M2P configuration similar to what I think I did with my other images. And it’s still working. One thing I haven’t done this time though, is selecting one of the pre-configured setups on the HiFiBerry tab. So maybe it is a good thing to keep your hands away from this?
Anyway, I have also made sure I got a backup now of a working setup in case I mess it up again 🙂
-
This reply was modified 8 years, 3 months ago by
-
You must be logged in to reply to this topic.